NEW ZEALAND & AUSTRALIA

GC3 USER MANUAL
FORESIGHT GC3
GOOD THINGS REALLY DO COME IN THREES
The GC3 is the Game Changer you’ve been holding out for. Industry-leading performance insight and true-to-life simulation come together in our most approachable offering yet. Thanks to the advanced photometric technology inside, the GC3 remains accurate and reliable both on the range and in your home simulator. Combine it with our FSX performance and gaming suite and enjoy hundreds of world-class courses, skill-building games, and global leagues and competitions. This user manual will help you better understand the proper set-up, operation, and care of your GC3.


THE PERSONAL LAUNCH MONITOR YOU'VE BEEN WAITING FOR
POWERING ON AND CONNECTING TO THE INTERNET
The first time you power up your GC3, you will be prompted to connect to the internet.
There are multiple ways to accomplish this:
1. Wi-Fi: To connect with Wi-Fi, choose your network, then enter the password.
2. Wired Ethernet Cable: Alternatively, you can connect to a PC via an Ethernet cable by connecting to either your local router or switch.

Note: To use all the functions of the GC3, it must connect to the internet at least once every 45 days. You will see a warning if you need to connect within 5 days. After 45 days, the GC3 will no longer connect with any supporting apps or software and you will see a screen prompting you to connect to the internet to restore all functions.
INDICATOR LIGHT
SETTINGS
Indicator Light Colors:
-
Blue: indicates that the device is in Ball Mode
-
Green: indicates that the device is in Club & Ball Mode
-
Yellow: indicates that the device is in Boot Mode. This is often associated to the start up on the product.
-
Red: indicates a error is present on the product. This would represent a Error Status.
-
White: indicates the device has the Quick Launch Menu Open. To resume use be sure to close the quick launch menu.
Indicator Light Status:
-
Blinking: Indicates the device is looking for a ball.
-
Solid: Indicates the device has locked onto a ball and is now ready for use.


BALL PLACEMENT & HITTING
To use your GC3, place upright approximately 2 feet away from the hitting area. If you are using a hitting mat, make sure the GC3 is raised to the same level as the hitting surface.
Place the ball on the ground in front of your GC3. If the ball is outside of the hitting zone, you will see the MOVE BALL INTO HITTING ZONE display. If there are multiple balls in the hitting zone, you will see the MULTIPLE BALLS DETECTED display. Once the ball is in the hitting zone, the GC3 will display the READY screen and the LED light will change from blinking to solid

BALL DATA EXPLAINED
Speed: The measurement of velocity just after impact. Ball speed is the main component in generating distance.
Launch Angle: The initial vertical angle of ascent relative to the ground measured in degrees. The launch angle, combined with ball spin and speed, determines the ball carry and total distance.
Push/Pull: In right-handed mode, Push is when the horizontal direction of the ball is greater than or equal to zero. The ball moves "in to out", away from the hitter. Pull is the opposite; the ball moves "out to in", towards the hitter.
Carry: The total distance of flight.
Side Spin: The degree of sideways (horizontal) spin. A component of total spin that defines ball curvature or shot shape. The more sidespin, the greater the ball curvature.
Back Spin: The backward rotation of the ball. A component of total spin that defines ball lift and trajectory. The more backspin, the greater the ball height.
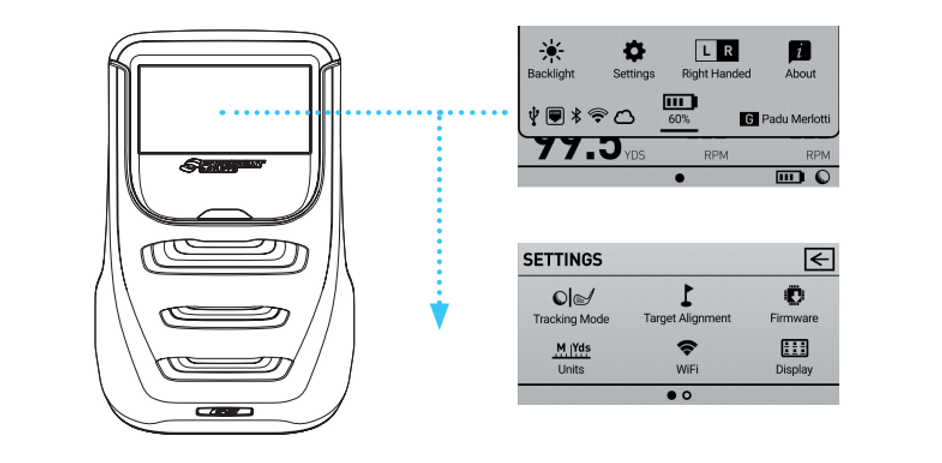
QUICK SETTINGS
On your GC3 display, swipe down to access the Quick Settings page. On the Quick Settings display, you can access the BACKLIGHT, SETTINGS, LEFT/RIGHT-HANDED modes, ABOUT, and you can check the battery life
QUICK EXPLAINED
Backlight: Turn on/off the screen backlight
Settings: The Turn on/off tracking mode, access target alignment, check firmware, choose units of measurement, access Wi-Fi, change the display, access diagnostics, access shot saver
About: Access account information, version, patents, system information, web dashboard, and counters
Battery: Check battery life
Left/Right Handed: Toggle between left and right handed modes

CLUB TRACKING
To turn on Club Tracking mode, swipe down to access the Quick Settings page, then go to SETTINGS, then TRACKING MODE.
Indicator Light Colors:
-
Blue Indicator Light indicates that the device is in Ball Mode
-
Green Indicator Light indicates that the device is in Club & Ball Mode
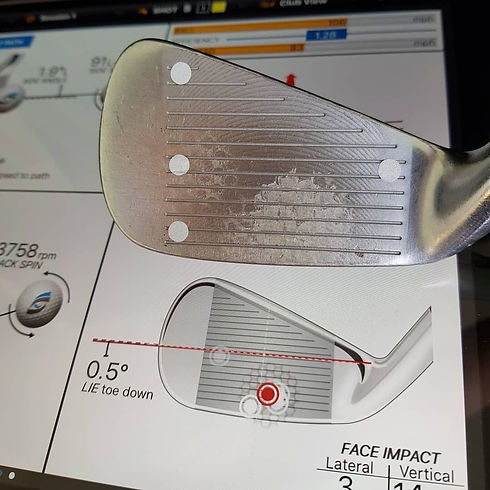
Applying a Club Marker
LEARN HOW TO APPLY CLUB MARKERS TO YOUR CLUB FACE
Your GC3 doesn’t only look at the ball, but the club too. To take advantage of this feature, open the club marker packet (included) and follow the directions to apply the club marker to your club
CLUB DATA EXPLAINED
After your next swing, your GC3 will now display club speed, path in and path out, angle of attack, and efficiency.
Club Speed: The speed the club is travelling just prior to impact. A higher speed means greater potential distance.
Path in/Path out: The direction the club head is moving at impact. A "0" path is a straight shot. A negative path means the ball moves "out to in" and a positive path means the ball moves "in to out".
Angle of Attack: The vertical angle of the club head at impact. A positive number is hitting up on the ball and a negative number is hitting down on the ball.
Efficiency: Efficiency, also known as Smash Factor, is the ratio between club head and golf ball velocities.
USING THE ALIGNMENT STICK
To activate target alignment, swipe down to access the Quick Settings page. Select SETTINGS, then go to TARGET ALIGNMENT
Target alignment can be adjusted up to 10 degrees on the GC3 via the FSS Alignment Stick. To adjust alignment, place the FSS Alignment Stick in the GC3 hitting zone and align to your target. Once aligned, step away from the device to allow for calibration.
After a few seconds, both LED indicators will show yellow and the unit will give an audible tone. The new alignment angle will be shown on the LCD screen.
Alignment can be viewed and reset at any time from the Target Alignment menu in System Options. To reset alignment to factory default in this screen, press the OK key. Alignment is always reset when the unit is powered off.


Storage And Maintenance
How to store the GC3
Prior to storing the GC3, make sure the device is powered off. Store the GC3 in a cool, dry environment in its original foam-lined packaging or in a specially designed carrying case to prevent damage.
Cleaning the GC3
To remove dirt, wipe the device with a damp cloth, be sure to gently clear the lenses in order to avoid scratching them. You may use an air can or compressed air to gently blow of loose items as well.